Contents
Introduction. 1
Creating PDF Files (iTextSharp). 1
Rasterizing PDF Files (GhostScript). 1
Placing PDF files in Spludlow Print
Documents. 1
Microsoft Print to PDF. 1
Microsoft XPS Document Writer. 1
Graphic Design with Code. 1
Prerequisites required for this demo. 1
Get a screen snap shot from MAME. 1
Tidy up the snap shot bitmap. 1
Run some code to convert the bitmap
to vectors. 1
Run some code to place 8 copies of
the artwork on a sheet. 1
The Spludlow Framework contains classes for creating PDF
files (using iTextSharp) and rendering PDF files (using GhostScript).
Example code:
string font = "Arial, 32, Bold, Italic, Underline";
using (Spludlow.Drawing.PDF pdf = new Spludlow.Drawing.PDF(@"D:\test.pdf", "A4"))
{
pdf.Text("Hello World!", font, 10, 10,
Color.Red);
}
Example code:
Spludlow.Printing.GhostScript.RenderPdf(@"D:\input.pdf", @"D:\output.png",
1200); // 1200 dpi
When placing an existing PDF into a print document then
printing to an iTextSharp PDF the vectors will be preserved, it will not be
rasterized.
When placing into bitmap formats it will rasterized at the
print DPI.
Bitmaps may also be placed into iTextSharp PDF files.
Windows has never supported PDF natively until recently. Now
the Edge browser can display PDF and a printer is built-in to create PDF files.
The printer may be useful occasionally, consider these
limitations:
·
Only available newer OS; Windows 10 & Server 2016.
·
Slow, going through the Windows Spooler.
·
Can’t place vectors (Placed vectors will be rasterized)
·
No control of font embedding (Seems to always embed and make a
mess of it looking in PDF file properties)
·
No automatic font renaming for the PostScript Standard 14.
·
No CMYK support
You can certainly use the printer during development and
easily change to the iTextSharp wrapper later.
XPS is an alternative to PDF that is always there but no one
has ever used it.
This printer and a viewer has been in built into Windows for
a few versions now.
The viewer is pretty awful but for quick tests XPS can be
quiet handy on occasion.
Creating PDF files in code can save you a lot of time in
Adobe Illustrator and you can achieve things you just couldn’t do any other
way.
In this demo we will start by running an old arcade game in
MAME, getting a screen shot, and using it for some trivial graphic design. How
you originate your designs is up to you maybe you can actually draw.
·
Spludlow.Drawing.PDF assembly must be installed on the machine
that will be creating the PDFs. “WSYS-HEAD-DEV” in this demo.
·
Ghostscript (64 bit,
default path) must be installed on the machine that the Intranet is running on,
to render the placed PDFs on the Print Preview page. “WSYS-HEAD-APP” in this
demo.
·
MAME was used to obtain some
artwork from an old game, you will also need the ROM zip for the game you want
to use.
·
A work directory with permissions for “SpludlowGroup”. In the
demo the “D:\” drive is given full control. A location within your profile will
not be suitable.
·
Visual Studio to write the code. Please see the Quick Start for more details.
·
Adobe Photoshop to clean up the bitmap. Other bitmap editors like
GIMP may be used.
·
Adobe Illustrator to create the design using vectors. Other
vector editors like Inkscape may be used.
·
Start up a power shell we will be using the command line to start
MAME
·
Change directory to the MAME installation
·
Obtain the game rom zip and put it into the “roms” directory.
·
Start MAME with “.\mame64.exe GAME_ID” my game is “diggerc”
because I like the worm. I’m using the “-window” switch here because I’m
running in remote desktop, you can leave this out to play full screen.
·
Hit space to get through the start-up messages. And wait for the
game to initialize.
·
Coin up with the ‘5’ key.
·
Start player 1 with the ‘1’ key.
·
Play the game up to the point you want to grab the graphics.
·
Hit the ‘F12’ key as many times as you want to take screen shots.
·
Exit MAME with the ‘ESCAPE’ key.
·
Look in the “snap” directory within the MAME installation and
find the best snap shot.
·
Open in Photoshop
·
Crop down to just the pixels you want.
·
Remove unwanted pixels. Using the “Magic Eraser Tool” with zero
tolerance and antialiasing off will do the job.
·
Save as a PNG to your work directory.
·
Open up your solution in Visual Studio.
·
Open up the TestForm project and go to the button1_click method
see the Quick Start for details on
setting this up.
·
Enter the following code:
Spludlow.Printing.PrintDoc doc = new
Spludlow.Printing.PrintDoc("A4");
Spludlow.Drawing.DrawShapes.BitmapToVector(doc, @"D:\Worm.png", 10, 10, 10, 0.4F);
Spludlow.Printing.Printer.Print(doc);
·
The BitmapToVector
method will draw a rectangle for each pixel. The Printer.Print method without
specifying a target will print to history only.
·
Go to the Intranet Print page to view the result.
·
If you are happy with the result you can re-print to a PDF in the
work directory on your development machine.
·
Check the result PDF and open in Adobe Illustrator
·
Select all and Object->Flatten Transparency, ensure convert
“Strokes to Outlines” is checked. This is so when the object is scaled the
outlines will also scale.
·
Save the modified PDF.
·
Go back to the button1_click method and enter the following code:
Spludlow.Printing.PrintDoc doc = new Spludlow.Printing.PrintDoc("A4");
string filename = @"D:\Worm.pdf";
float scale = 0.05F;
float angle = 0;
float y = 10.0F;
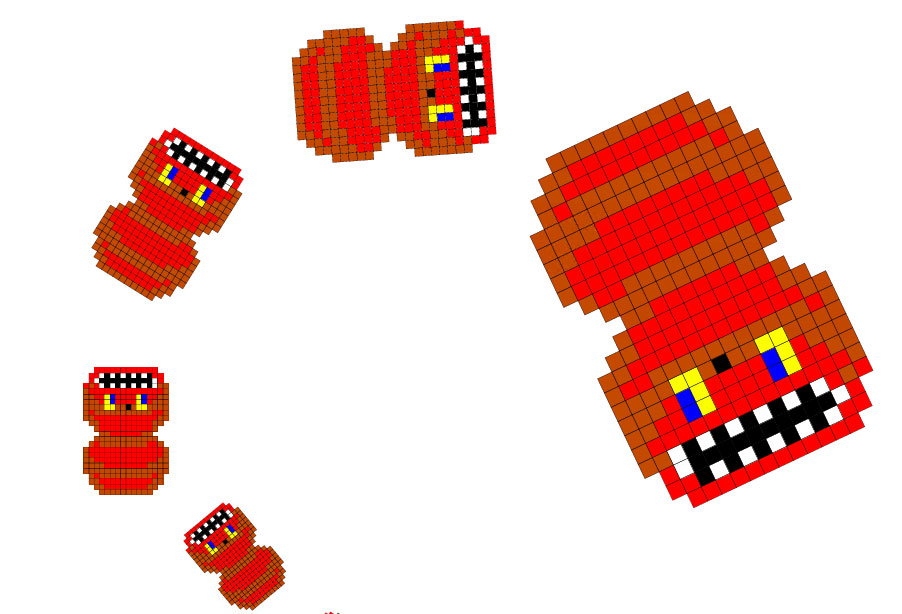
for (int step = 0; step < 8; ++step)
{
doc.PlaceAngle(filename, 100, y, scale, angle, 1);
scale *= 1.25F;
y += scale * 250.0F;
angle += 30.0F;
}
Spludlow.Printing.Printer.Print(doc);
·
Run the code this will place 8 copies of the artwork as different
sizes and rotations.
·
Go back to the Intranet Print page and click “Refresh Host” to
see the last thing printed.
·
Re-Print to another PDF and open in Adobe Illustrator.
·
Finish the graphic design.
Some final points on the demo
Here we used Spludlow.Drawing.PrintDoc and printed it to
history to view on the Intranet before creating the final PDFs. This approach
may be slow previewing with more placed files as each placed PDF spawns a
Ghostscript process to render the preview bitmap. It’s far more efficient to
use the Spludlow.Drawing.PDF directly like shown in the top of this page and if
you want to make CMYK PDFs then this is your only
option, only downside is it won’t be in the Print History.