Contents
Introduction. 1
Prerequisites (OS Preparation). 1
Permissions. 1
Note for older version of Windows
with IIS <= 7.5. 1
Download, Extract and get a Command
Prompt up. 1
Installing the First “Master” Host. 1
Create and open the SETUP.txt file. 1
Edit the SETUP.txt file. 1
Automatically add the required
security group and 2 user accounts to the OS. 1
Add Windows User to the Database
Computer (If Required). 1
Add Login for “SpludlowUser” to the
database. 1
Main install 1
Installing Additional “Node” Hosts. 1
Create and open the SETUP.txt file. 1
Edit the Credentials section of
SETUP.txt. 1
Automatically Add the required
security group and 2 user accounts to the OS if required. 1
Create the new Host within the
Master’s Intranet. 1
Release Spludlow.config to all
existing hosts. 1
Put new host’s Spludlow.config file
in the Setup Directory. 1
Main install 1
Installing a “Node” on another
network. 1
Expose IIS to the Internet at both
ends and test. 1
Add new network to Intranet. 1
Perform Node Install 1
Add Routing Queue on new node
(WSYS-BRAN network) 1
Add Routing Queue on existing master
(WSYS-HEAD network). 1
Start the new Spludlow Service. 1
Re-Send all config. 1
Un-Installing. 1
Removing a Node Host. 1
Removing the Master Host. 1
This page should provide everything you need to install the
Framework on a host.
All the installation steps are performed in the command
prompt “cmd” running with administrator privileges. The commands you need to
enter are highlighted in dark blue, I recommend you copy and paste them all to
prevent mistakes. TIP: You can select a line of text by treble clicking it.
The first node you install is the “Master” it is the only host
that needs access to a database for storing configuration and logs, it also
runs the Framework’s Intranet (the web user interface).
All other hosts are referred to as a “Node” and do not
require database access, although they may well need it for whatever
applications you are running on them.
Installation is slightly different when installing the
master if you are using WORKGROUP users and the database will be on another
host, see the relevant section below.
Videos are provided throughout showing the steps involved.
The OS must have 7-Zip installed, IIS, MSMQ, and .net
correctly configured before starting. Please see the Prerequisites Page on this with videos.
Please ensure the following (for a standard installation):
·
You are running the command prompt with Administrator privileges
(essential)
·
If you are creating Windows Domain Users (not WORKGROUP) you must
be logged in as a user who is in the “Domain Admins” group.
·
If you are using Windows Authentication for the database (no
passwords in connection strings) your logged in user must be a member of the
“sysadmin” role in the database.
If you are not willing or able to meet the permissions
requirements you can skip certain steps like creating Windows users or database
logins and perform them manually, see the relevant sections below.
Older versions of IIS 7.5 and below will use temporary user
profiles. To prevent this create the user profiles in advance as detailed here.
Do this after creating users and before the main install run
the following 2 commands (Substitute the host or domain name):
runas /profile
/user:"HOSTORDOMAIN\SpludlowUser" notepad.exe
runas /profile /user:"HOSTORDOMAIN\SpludlowAdmin"
notepad.exe
Get the main installer setup archive from downloads page. Put it at the root of the C drive (save
to downloads, then move to C drive).
Right click -> 7-Zip -> Extract here (the archive
contains a single directory at root) to give the directory “C:\ SpludlowSetupV1”.
Start an Administrator Command Prompt.
Enter the following:
cd C:\SpludlowSetupV1
dir
You should see a directory listing that includes
“Spludlow-Process.exe”. You must remain in the directory for all of setup.
From here you are ready to continue to the relevant section:
·
Installing the First “Master” (First) Host
·
Installing Additional “Node” Hosts
·
Installing a “Node” on another network
The Master Host is the only one that requires access to a
database for storing host configuration and the logs.
SQL Server on same machine SQL
Server on separate machine


Enter the following:
Spludlow-Process.exe Spludlow Spludlow.Setup
MakeFileMaster
notepad.exe SETUP.txt
You should now be viewing the setup file in notepad.
The “SETUP” file is where all customizations for the install
are set. You should go through the file and make any amendments relevant to you.
The file contains notes of what configurations are required,
here’s a brief list of the important ones.
·
Credentials – Windows Users that will be created or used. With
local users (WORKGROUP) the same user and password should be configured on all
hosts (if you want to share resources), so all nodes should have these details
compiled from the master’s SETUP.
·
Databases – There are 2 connection strings; an admin one used at
install then creating the database login and schema and the standard connection
string used by the framework when running. Ensure all hostnames are correct if
you are using local users on a remote database server you need to change all
the hosts to that of the database.
·
Organization – The names used for referencing make sure you set “OrganizationId”
and “NetworkId” you can change the rest later. In the example the organisation
is set to “WSYS” for “Weird Systems” and the network “HEAD” for the “Head
Office”. I recommend you name all your hosts in the ORG-NET-USEAGE format so
the “Application Server” here is called “WSYS-HEAD-APP”
Don’t forget to save the file when finished!
NOTE: This step can be performed manually
This step will add 2 users and a security group to Windows
either locally or in active directory (domain controller) based on entries in
the SETUP.txt file
Enter the following:
Spludlow-Process.exe Spludlow Spludlow.Setup
UsersAndGroups
You should get 6 lines of output about adding groups, users
and adding users to groups. Check for obvious errors.
NOTE: This step can be performed manually
Ignore this step if any of the following are true:
·
You are NOT using Windows Authentication (no passwords in
connection strings) with your database server.
·
You are using Domain Users for Windows Authentication.
·
You are using Local Users (WORKGROUP users) for Windows
Authentication and the database server is running on the same computer as the
Spludlow Master Node.
You need to perform this step when all the following
are true:
·
You are using Windows Authentication.
·
You are using local accounts (WORKGROUP) not domain accounts (You
may still be in a domain but you would rather use local accounts).
·
The database server is running on another computer to the
Spludlow Master Node.
For Windows authentication on the database server to work
the Windows user account must exist on the database server. These 3 steps must
be performed on the database server:
·
Create local user “SpludlowUser” with the same password from the
SETUP.txt file.
·
Create local security group “SpludlowGroup”
·
Add the user to the group
You can do this manually if you like or copy the install
folder to the database server and run the following:
(On database Server) cd
C:\SpludlowSetupV1
Spludlow-Process.exe Spludlow Spludlow.Setup
LocalUsersAndGroups
NOTE: The video shows accessing the
C drive on the master from the database server using an administrative share “\\WSYS-HEAD-APP\C$”.
To do this file sharing must be enabled and the “LocalAccountTokenFilterPolicy”
registry hack applied to the target host (the registry hack is not required
when using a Domain Administrator).
NOTE: This step can be performed manually
This step adds the standard account the Framework uses as a
login on the database server.
Enter the following:
Spludlow-Process.exe
Spludlow Spludlow.Setup DatabaseLogin
This is the main install, it puts all the binaries and data
directories in place, creates message queues, and installs some web services
and a service process (Windows Service).
Provided the Override flag is set to true then setup will
automatically remove and replace, in a clean manor, anything that already
exists. So if a problem occurs in setup it can be simply run again when the
problem is fixed.
Enter the following:
cls
Spludlow-Process.exe Spludlow Spludlow.Setup
InstallMaster
You should get a good page of output. Check through it and
make sure there are no errors in there.
The last few lines of the output should contain the address
of the Intranet, start a browser and go there.
Example: https://WSYS-HEAD-APP/Spludlow-IntranetV1-WAQQ/
If you get “Service Unavailable” then the application pool
has stopped, look in the Windows Logs, good chance that the user login
credentials aren’t right. Double check the SETUP.txt file and run install
again.
Go to the “Status” Intranet page and select a
Spludlow-Service line then click “Start Service”, everything should be
“running”.
If the “Log” task is displaying an error, there is a good
chance something isn’t right with the database connection, maybe connection
string wrong or not in configuration.
You should now have a Master host up and running with the
Intranet running on it. On the new hosts start off like you did for the master.

Enter the following:
cd C:\SpludlowSetupV1
Spludlow-Process.exe Spludlow Spludlow.Setup
MakeFileNode
notepad.exe SETUP.txt
You should now be viewing the setup file in notepad.
If using domain users, the 5 items in the credentials
section will be the same on all hosts within the domain, so copy all 5 from the
Master’s SETUP.txt file.
If using local (workgroup) users, then ‘SpludlowUserPass’
should be the same on all hosts on LAN (if you want them to share network
resources). So copy and paste the value of ‘SpludlowUserPass’ from the master’s
SETUP.txt file to this one.
Don’t forget to save the file when finished!
If you are using domain users, then you can skip this step
as it was already done when installing the Master.
This step will add 2 users and a security group to Windows
either locally or in active directory (domain controller) based on entries in
the SETUP.txt file
Enter the following:
Spludlow-Process.exe Spludlow Spludlow.Setup
UsersAndGroups
You should get 6 lines of output about adding groups, users
and adding users to groups. Check for obvious errors.
If your new host is on a new separate network, please add a network
record on the Intranet Config.aspx page first (see the “Additional Networks”
section below).
Using the “Quick Add Host” section on the bottom if the
Internet Config.aspx page; enter the following 4 pieces of information, all but
network should all be copy and pasted from the SETUP.txt file on the new host
within the “Web Paths” section.
·
MachineName
·
Network
·
Spludlow-WebService-Admin
·
Spludlow-WebService
After clicking “Add Host” cast your eyes over the new record
and check everything looks like it does in the master record.
New Network: You can edit the public addresses now if you
are using multiple networks.
If you are adding the first host on a new network, then the
“PublicWebAddress” needs setting for one host on every network, this makes that
host a “Router” (should do! at moment set in network record), this is the way
in and out for everything to and from remote networks. Router host’s carry an
additional routing message queue for every remote network.
This step makes the new host visible to all existing hosts
even though it’s not actually up yet. On the Internet Config.aspx page under
the section “Send and View Host Configuration files” click the button “Toggle
Hosts” to select all existing hosts then click “Send Spludlow.config”. The new
configuration files are pushed out to all existing hosts and then web service
application pools and service processes are restarted, please allow a few
moments then go to the Internet Status.aspx. As you just restarted everything
you may get “Service Unavailable” for the Intranet page and existing hosts
maybe showing various errors, just click “Query” every few seconds until it
settles down and everything finishes restarting. You should end up with
something like this:
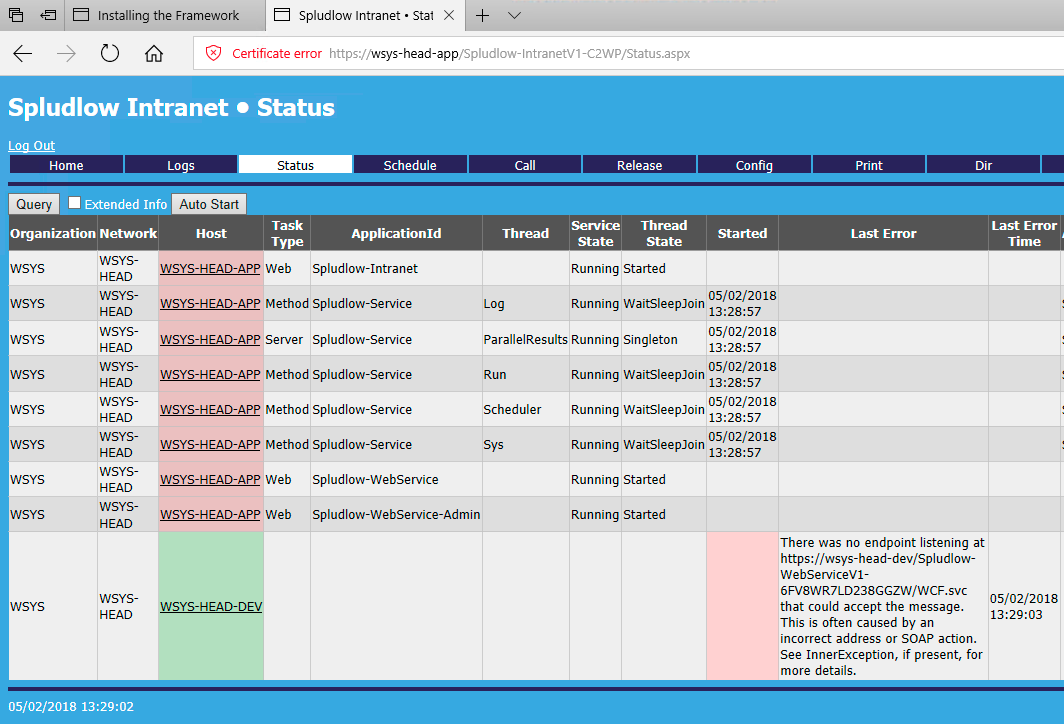
The new host is offline because we haven’t finished setting
it up yet.
Stay in the Intranet and go to the Config.aspx page under
the section “Send and View Host Configuration files”. Click on the link in the
column “Offline (New Host)” that corresponds to new host, you should get a page
of text, select all (CRTL-A) and copy (CTRL-C) for later.
Have a look in the setup directory “C:\SpludlowV1Setup” on
the new host, there should be a file “Spludlow.config” file that is empty (0
bytes), open it in notepad and paste (CTRL-V) the text from earlier, save and
close the file.
notepad.exe Spludlow.config
This is the main install, it puts all the binaries and data
directories in place, creates message queues, and installs some web services
and a service process (Windows Service).
If a problem occurs in setup it can be simply run again when
the problem is fixed.
Enter the following:
cls
Spludlow-Process.exe Spludlow Spludlow.Setup
InstallNode
You should get a good page of output. Check through it and
make sure there are no errors in there.
Go back to the Intranet Status page and the new host should
be visible. Select a Spludlow-Service line and click “Start Service”. The new
host is up and running.
When hosts are on different networks they cannot directly
access message queues on remote networks. The framework overcomes this by
putting outbound network queue messages on a local Routing queue first, then
uploading the message into the remote network through the web service with a
public address, from there it then is sent to the final destination message
queue.

Ensure IIS is running and accessible from the other end at
both networks, see below for further details.
In this example DNS records have been added so we can easily
test from both ends using a browser:
From WSYS-BRAN network browse to: https://wsys-head-app.weirdsystems.com/
From WSYS-HEAD network browse to: https://wsys-bran-app.weirdsystems.com/
You should see the default IIS page at both ends.
Enter the following new network record on the Intranet
Config page:
·
NetworkId : WSYS-BRAN
·
OrganizationId : WSYS
·
Disabled : False
·
Notes : ""
·
Configuration : ""
·
RouterHostId : WSYS-BRAN-APP
·
SmtpServer : WSYS-BRAN-APP
·
QueueNamespace : SpludlowV1
NOTE: Double Quotes mean empty string as NULL not allowed
in database.
When the record is added and you have checked it, tick all
hosts and “Send Spludlow.config”. This will update all hosts so they are aware
of the new network, for example the Intranet Config Page “Quick Add Host”
function now has the new network in the drop down.
Do Node install as detailed above. Make sure you set the public
addresses in config for the hosts that will be routers at both ends.
NOTE: Using the same password for SpludlowUser on separate
networks is not necessary as no direct connection exists, however you may find
it more convenient to use the same password, just so you only have to keep
track of one password.
NOTE: The last step of node install, checking the status
page will give the error: “The queue does not exist or you do not have
sufficient permissions to perform the operation.” This is because the web
service is attempting to log and the routing queue does not exist yet, the next
step will fix this.
Run the following command (in any directory):
"C:\Program
Files\SpludlowV1\Spludlow-Process\Spludlow-Process.exe" Spludlow
Spludlow.Setup MessageQueuesRouting "WSYS-BRAN-APP\SpludlowUser"
NOTE: don’t run Spludlow-Process.exe in the setup directory
it isn’t using the live config file.
Open the Spludlow Service Config file:
notepad.exe "C:\ProgramData\SpludlowV1\Config\Spludlow-Service.txt"
Add a line, below the existing message queue lines (Ensure
tabs are separating the fields not spaces):
Method Route.WSYS-HEAD Spludlow Spludlow.QueueProcessor Run Route.WSYS-HEAD
Save and close the file.
Run the following command (in any directory):
"C:\Program
Files\SpludlowV1\Spludlow-Process\Spludlow-Process.exe" Spludlow
Spludlow.Setup MessageQueuesRouting "WSYS-HEAD-APP\SpludlowUser"
NOTE: don’t run Spludlow-Process.exe in the setup directory
it isn’t using the live config file.
Open the Spludlow Service Config file:
notepad.exe
"C:\ProgramData\SpludlowV1\Config\Spludlow-Service.txt"
Add a line, below the existing message queue lines (Ensure
tabs are separating the fields not spaces):
Method Route.WSYS-BRAN Spludlow Spludlow.QueueProcessor Run Route.WSYS-BRAN
Save and close the file.
From the Intranet status page start the new service.
From the Intranet config page send Spludlow.config to all
hosts. After everything has restarted everything is now ready to go.
NOTE: This un-install only currently works when used from
the same “SpludlowSetupV1” as used during the install.
NOTE: Setup will not remove any OS Users and Groups it
created and will not remove the database login. You will have to remove these
manually: “SpludlowAdmin”, “SpludlowUser”, and “SpludlowGroup”.
NOTE: You may want to delete user profiles before
deleting the users.
To remove a node host, enter the following:
cd C:\SpludlowSetupV1
Spludlow-Process.exe Spludlow Spludlow.Setup
RemoveNode
Removing the Master will also delete the Spludlow database
from the server, enter the following:
cd C:\SpludlowSetupV1
Spludlow-Process.exe Spludlow Spludlow.Setup
RemoveMaster
NOTE: If there is a problem reported uninstalling, give
it a moment and try it again, I’ve occasionally seen locked files.